Are you drowning in repetitive tasks that eat up your workday? Do you find yourself manually copying data between apps, sending the same emails repeatedly, or forgetting to notify your team about important updates? It’s time to reclaim your productivity with Make automation.
In this comprehensive guide, you’ll learn how to use Make (formerly Integromat) to automate virtually any workflow—no coding required. Whether you’re managing orders, tracking leads, or coordinating team projects, Make automation can transform hours of manual work into seamless, automated processes.
Learn more about automation benefits at Zapier’s Automation Guide or explore the official Make.com Documentation for detailed technical resources.
Related: Check out our No-Code Tools Comparison to see how Make stacks up against other platforms.
What Is Make Automation and Why Should You Use It?
Make automation is a powerful visual automation platform that connects thousands of apps and services, allowing them to work together seamlessly. Instead of manually transferring data between applications, Make automation creates automated workflows (called “scenarios”) that trigger actions across your favorite tools.

The Power of No-Code Automation
The beauty of Make automation lies in its accessibility. You don’t need to be a developer or have technical expertise to create sophisticated automations. With its intuitive drag-and-drop interface, anyone can:
- Connect apps like Google Forms, Sheets, Microsoft Teams, Slack, and thousands more
- Automate repetitive tasks that consume valuable time
- Reduce human error in data entry and communication
- Scale operations without adding more staff
The best part? Make offers a free plan with 1,000 operations per month—more than enough to start automating your workflows and see immediate results.
New to automation? Read our Beginner’s Guide to Workflow Automation first.
Getting Started: Setting Up Your Make Automation Account
Before diving into automation, you’ll need to create your Make account. Here’s how to get started:
- Visit Make.com (external link to official site) and click “Get Started Free”
- Fill out the registration form with your details
- Choose your plan: Start with the free tier (1,000 operations/month) or upgrade to Pro for 10,000 operations and advanced features
- Verify your email and complete the onboarding process
Once registered, you’ll land on the Make dashboard—your command center for all automation activities. The left sidebar provides access to scenarios, templates, connections, and organizational tools.

Understanding Make Automation Scenarios: The Building Blocks
In Make terminology, a scenario is an automated workflow that connects apps and defines how data flows between them. Each Make automation scenario consists of:
- Triggers: Events that initiate the automation (e.g., a new Google Form submission)
- Actions: Tasks that execute after the trigger (e.g., adding a row to Google Sheets)
- Routers: Paths that split workflows into multiple branches
- Filters: Conditions that determine whether data should proceed
Exploring Make Automation Templates
Make offers thousands of pre-built templates to jumpstart your automation journey. Navigate to the Templates section to discover popular scenarios like:
- Collect webhook data and feed it into Google Sheets
- Forward Telegram messages to Discord
- Sync CRM data with email marketing tools
Browse thousands of templates at the Make Template Gallery.
See also: Top 10 Automation Templates for Small Business
These templates serve as excellent learning resources and starting points for custom Make automation workflows.

Building Your First Make Automation: Step-by-Step Example
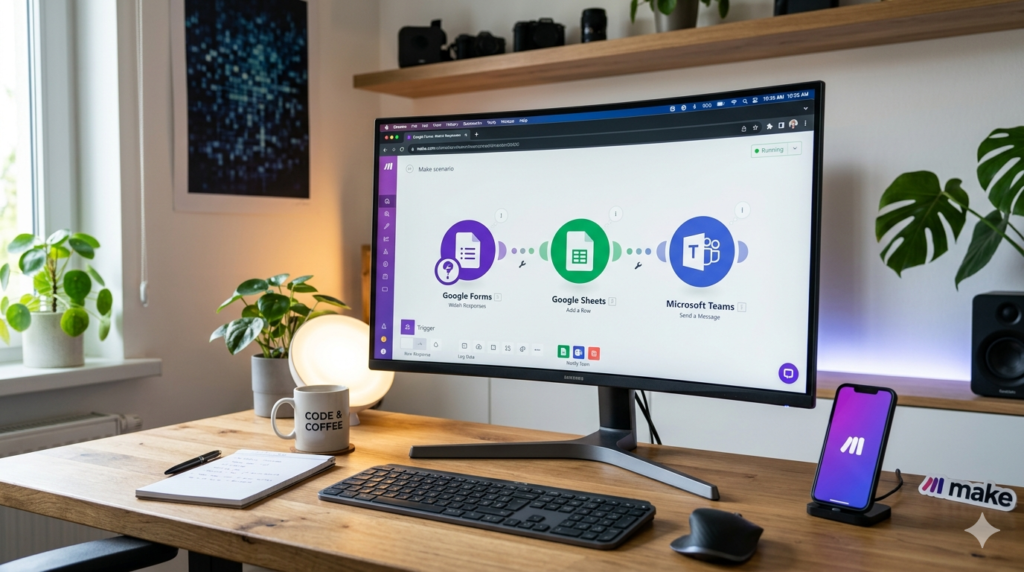
Let’s create a practical Make automation scenario: automating cookie order processing from Google Forms to Google Sheets, email confirmations, and Microsoft Teams notifications.
Step 1: Setting Up the Trigger with Google Forms in Make Automation
Every Make automation scenario starts with a trigger. In our example, we want the automation to run whenever a customer submits a cookie order via Google Forms.
- Click “Create a New Scenario” from your dashboard
- Click the plus icon in the center of the canvas
- Search for “Google Forms” and select it
- Choose the trigger: “Watch Responses” (triggers when a new response is received)
- Connect your Google account if this is your first time
- Enter your Form ID: Navigate to your Google Form, copy the ID from the URL (between
/d/and/edit), and paste it into Make - Set the limit (number of responses to process per run)—start with the default of 2 for testing

Step 2: Testing Your Make Automation Trigger
Before building further, test that Make can successfully retrieve data from your form:
- Submit a test order in your Google Form
- Click “Run Once” in Make
- Review the bundle (data output) to ensure all form fields are captured correctly
You should see all the form responses, including customer name, email, shipping address, cookie type, quantity, and special instructions.
Adding Google Sheets to Your Make Automation Workflow
Now that we’re capturing form data, let’s automatically add it to a tracking spreadsheet using Make automation.
Configuring the Google Sheets Module in Make Automation
- Click the plus icon next to your Google Forms module
- Search for “Google Sheets”
- Select the action: “Add a Row”
- Connect your Google account (if not already connected)
- Select your spreadsheet: Choose the file from your Google Drive
- Select the sheet (e.g., “Sheet1”)
- Confirm your sheet contains headers
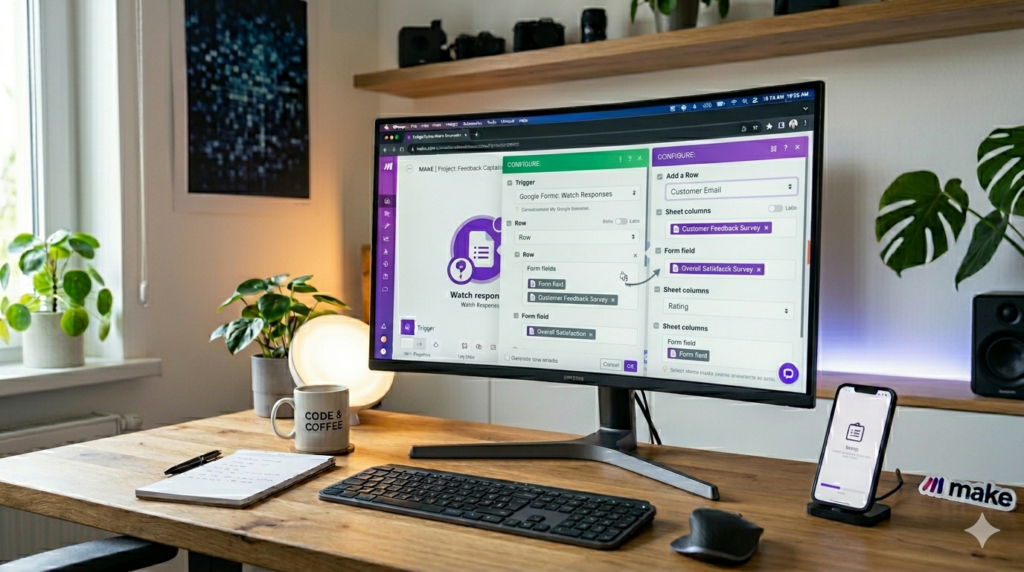
Mapping Form Data to Spreadsheet Columns in Make Automation
This is where the magic happens. For each column in your spreadsheet, map the corresponding form field:
- Customer Name → Form field: “Your Name”
- Email Address → Form field: “Respondent Email”
- Shipping Address → Form field: “Shipping Address”
- Cookie Type → Form field: “Select Cookie Type”
- Quantity → Form field: “Quantity”
- Special Instructions → Form field: “Special Instructions”
Click into each field and select the appropriate data from the Google Forms bundle. This creates a dynamic connection where every new order automatically populates your spreadsheet.
For advanced spreadsheet techniques, check out Google Sheets API Documentation.
Implementing Filters in Make Automation: Validating Orders
Not all orders should proceed through your Make automation workflow. Perhaps you only ship domestically, or you need to validate order minimums. Make’s filter feature lets you set conditions that data must meet.
Setting Up a US-Only Filter in Make Automation
- Click the filter icon between Google Forms and Google Sheets modules
- Label your filter (e.g., “US Orders Only”)
- Set the condition: Shipping Address → Contains → “United States”
- Choose case-insensitive matching to catch variations
Now, international orders will stop at this filter and won’t clutter your tracking sheet or trigger notifications.

Automating Customer Emails with Make Automation
Once an order is validated and logged, send an instant confirmation email to your customer using Make automation.
Configuring the Email Module in Make Automation
- Add a new module and search for “Email”
- Select “Send an Email”
- Configure the recipient: Map the “Respondent Email” field from Google Forms
- Set the subject: “Your Cookie Order Is Confirmed”
- Compose the message using dynamic values:
- “Dear [Customer Name from Form]”
- “Thank you for ordering [Quantity] [Cookie Type] cookies”
- “We’ll ship to: [Shipping Address]”
This creates a personalized mail merge that feels human-written but requires zero manual effort.
Learn more about Email Marketing Automation Best Practices.
Microsoft Teams Integration with Make Automation
Keep your fulfillment team in the loop by automatically posting new orders to a Microsoft Teams channel using Make automation.
Setting Up Microsoft Teams in Make Automation
- Add a Microsoft Teams module
- Select “Send a Message to Channel”
- Get your Team ID and Channel ID:
- In Teams, right-click the channel
- Select “Get link to channel”
- Extract the Team ID and Channel ID from the URL
- Craft your notification message:
- “🚨 New Order Alert!”
- “Customer: [Customer Name]”
- “Order: [Quantity] x [Cookie Type]”
- “Ship to: [Shipping Address]”
Using Routers for Parallel Make Automation Actions
Since you want to send both an email AND a Teams notification, use a router to split the workflow:
- Drag a connection from Google Sheets
- Create two branches: one to Email, one to Teams
- Both actions execute simultaneously

Explore more collaboration tools in our Team Communication Apps Guide.
Scheduling Your Make Automation: Set It and Forget It
Manually running scenarios defeats the purpose of Make automation. Enable scheduling to run your workflow automatically.
Configuring the Schedule in Make Automation
- Toggle the schedule switch at the bottom left
- Choose your frequency:
- Regular intervals: Every 15 minutes, hourly, etc.
- Specific times: Daily at 9 AM, weekdays only, etc.
- Consider your operation limits: More frequent runs consume more operations
For order processing, checking every 15 minutes strikes a good balance between responsiveness and efficiency.
Testing and Troubleshooting Your Make Automation
Before going live, thoroughly test your Make automation:
Testing Strategies for Make Automation
- Run individual modules: Right-click any module and select “Run This Module Only”
- Test branches separately: Unlink connections to isolate specific paths
- Submit real test data: Use actual form submissions to verify end-to-end flow
- Check operation usage: Monitor your free tier limits
Common Make Automation Issues and Solutions
- Connection errors: Re-authenticate app connections
- Missing data: Verify field mappings and form IDs
- Filter blocking data: Review filter conditions and test with qualifying data
Having issues? Check our Make Automation Troubleshooting Guide.
Advanced Make Automation Features
Once you’ve mastered simple scenarios, explore these powerful Make automation capabilities:
- Data aggregation: Combine multiple records into one
- Text parsing: Extract specific information from strings
- Error handling: Create fallback paths for failed operations
- Webhooks: Trigger scenarios from external services
- Iterators: Process arrays and collections of data

Ready for enterprise automation? Read Gartner’s Automation Trends Report.
Conclusion: Transform Your Workflow with Make Automation
Make automation transforms how you work. What once took hours of manual data entry, email composition, and team coordination now happens automatically in the background.
In our cookie order example, you’ve eliminated:
- ✅ Manual spreadsheet updates
- ✅ Repetitive confirmation emails
- ✅ Forgotten team notifications
- ✅ Human data entry errors
And this is just the beginning. With thousands of apps available and endless workflow possibilities, Make automation can automate virtually any repetitive task in your business.
Ready to start automating? Create your free Make.com account today and build your first scenario. Your future self will thank you for the hours of productivity you’re about to reclaim.
Next steps: Advanced Make Automation Techniques | Automation ROI Calculator
Leave a Reply